Tuesday, July 19, 2011

Grandma's Raspberry Pie


I have the most awesome grandmother. Ever. When I was 5 she taught me how to play poker (and beat my uncles), when I was 10 she hand-made costumes for my dogs, and when I was in college she taught me to bake. Unfortunately, I have a terrible poker face, but my love of desserts (and of dogs, but not necessarily in costumes) has endured!
Grandma's prize winning dog costumes. The milkmaid and the cow. Ignore the look of shame on the dogs faces. They didn't mean it.

The summer after my first year in college I split my time between Lexington, where I worked at a local ice cream parlor, and Louisville, where my career working with nonhuman primates began. Although this meant commuting back and forth once or twice a week, there was a silver lining – Grandma’s raspberry pie.

When I arrived in Louisville on Monday, Grandma would have a raspberry pie, made with raspberries picked fresh from her backyard. We would eat pie with every meal, steadily working our way through it until Thursday, when I would eat one last slice of pie before hitting the road back to Lexington. When I returned the following Monday, there was a brand new pie waiting for me. Bliss.

One visit Grandma showed me how to make this pie, and it has been a staple in my house ever since. One day, when I get a real job, I’ll plant raspberries and rhubarb in my back yard and my life will be complete.

Grandma's Raspberry Pie

Ingredients: 
1 1/4c flour
3 T powdered sugar
½ c butter
1 c sugar
3T + 2 t cornstarch
1 ½ c cold water
3T corn syrup
¼ c strawberry jello mix
1 quart fresh raspberries
1 t vanilla

In a food processor, combine the flour and powdered sugar. Add the butter until crumbly. (The food processor is a modernization of my grandmother’s method, but if you find yourself without one, you can use a pastry cutter, or even two knives, to cut the butter into the flour. This takes way more patience than I have).

Press the crust onto the bottom and sides of an ungreased deep dish 9 inch pan.

If you don’t have a deep dish pan, you could try a springform pan, or you can follow my lead and go for… I know, I’m becoming cliché… jars! I just did the bottoms because I was in a hurry. Feel free to be creative.

Also, if you don’t have a deep dish pan, you can do like my friend “Dennis”, who just made this recipe for her boyfriend’s birthday and put the bits that wouldn’t fit in the crust into ramekins. You know, for breakfast.
Way to make a beautiful tasty pie, Dennis!

Bake the crust at 350 for 15 – 25 minutes (depending on the size of your pan, of course), or until the edges are golden brown.

In the meantime, combine sugar and cornstarch in a saucepan.

Then stir in the water until smooth and add in the corn syrup, stir, and bring to a boil.

Once it starts to boil, cook and stir for 2 minutes until it thickens up.

Remove this from the heat and stir in the jello and vanilla until the jello is dissolved.

Cool this to room temperature, about half an hour. If you’re in a hurry, you can make an ice bath to cool it down – just put some ice / ice water in a bowl and set your pan inside the bowl.
A water bath is a great way to speed up the cooling down process!

Once the goo has cooled, add the raspberries in, stirring gently with a spatula to coat them.

Spoon this mixture into the crust, cover and refrigerate until set.


It’ll take about 3 hours to set up thoroughly, so in the meantime, see if you can get the dog up off the couch and go for a run... hmm... maybe not... she looks awfully comfortable there... ok, change of plan. Join the dog on the couch for a nap.

Try serving your pie with a little homemade vanilla ice cream (you don't even have to make it patriotic!), and enjoy!

Wednesday, July 13, 2011

The Strawberry Cake That Started It All...

Our eyes locked across my dad’s crowded birthday party. My little heart went pitter patter and I could have swooned…


This is the cake that started my love affair with desserts—a strawberry cake with strawberry icing, baked in a heart-shaped pan, the traditional birthday cake in my family for many years (at least until my dad went crazy and became a health nut… pff…).

This was THE cake in my life. THE dessert of dreams. THE cake to which my young self compared every confection I tasted… And now it can be yours…

Strawberry Cake

Ingredients: 
1 box yellow cake mix
1 3-oz box strawberry jello
1 10-12 oz pkg of frozen strawberries (or 2 pints of fresh strawberries)
½ c water
½ c oil
4 eggs
1 box (4 cups) powdered sugar (+ up to about a cup or so more, depending on how thick you want the icing)
1 stick melted butter

Preheat your oven to 350.

If you’re making this recipe with fresh strawberries, the recipe will be a little bit different than if you’re making it with frozen berries. If you’re using frozen berries, let them thaw over a strainer placed over a measuring cup.

Thaw until you get about 1 c of juice.

If you’re using fresh strawberries, hull about half a pint of them, then liquefy them in a blender. You want to have about a cup here too, so add strawberries as necessary until you get to a cup.


Now, combine cake mix, strawberry jello, strawberry juice / puree, water, oil, and eggs.


Mix thoroughly.


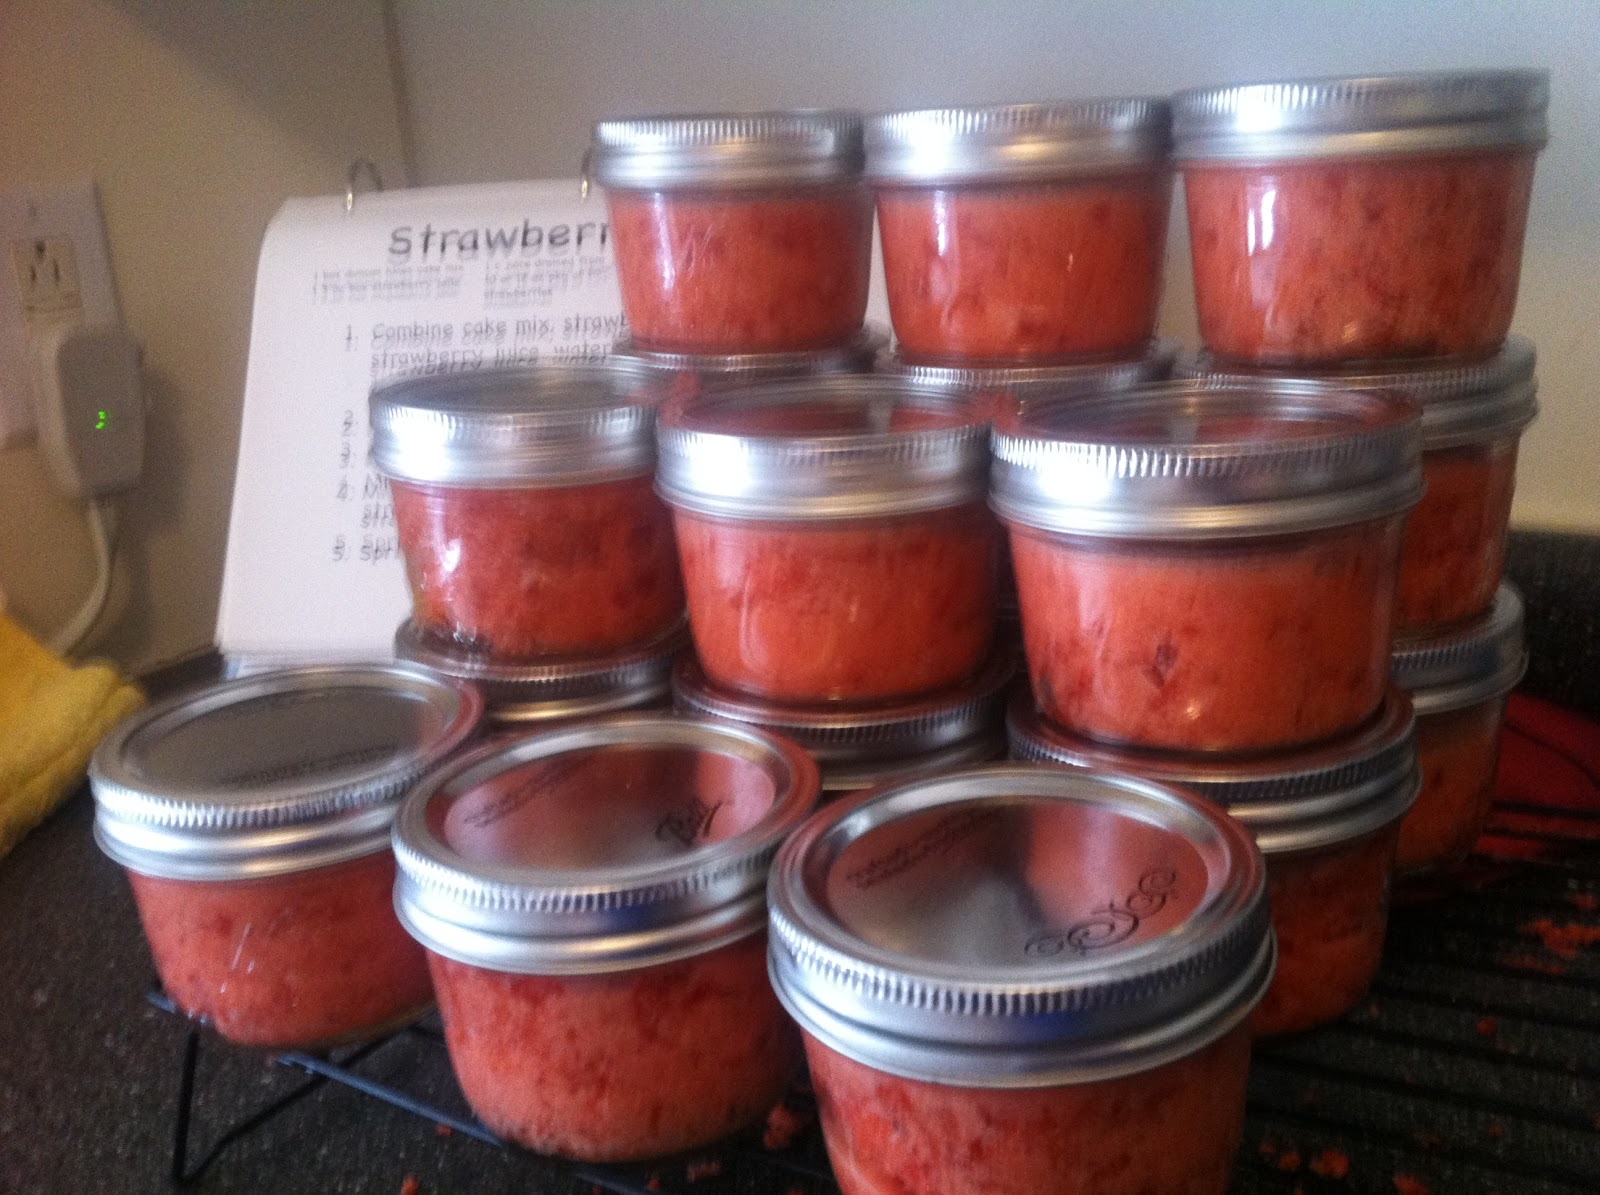
Prepare 3 – 8” round pans (or you can use a 9X13, or, if you’re going to a picnic like me, you could go with jars!) by spraying with cake release, or buttering/flouring them.


Bake for 20 – 30 minutes (depending on your pan size) or until a toothpick inserted in the middle comes out clean (or with a few crumbs).

If you’re doing a layer cake, or baking your cakes in jars, cool on a wire rack for about 10 minutes, then slide a knife around the edge of the cake, place a cooling rack on top of the cake, and invert. Then take a second cooling rack and flip it again so the top of the cake is facing upward.


I cut my little jar cakes in half to simulate a layer cake, feel free to do whatever you want!

Let your cake cool to room temperature, and while it’s doing so, you can go ahead and make the frosting. To do this, mix the powdered sugar melted butter and strawberries, adding more powdered sugar until you get an icing of your desired consistency.


Ice the cake! Note, this icing is a little bit on the runny side, so you’ll want to thicken it up a lot or consider cutting back on the butter if you’re making a layer cake.


Hope you love it as much as I certainly have!

Thursday, July 7, 2011

ProTips that Actually Work: Reviving Vegetables

Fancy things that you read about or see on TV shows that actually aren’t that hard to do. Or maybe are a bit hard to do, but totally worth it.

Where I learned about it: Mark Bittman? A men’s magazine cooking section? No idea.

I know among the posts about ice cream and chocolate chip cookies (delicious!) this may seem a strange posting, but I continue to be delighted that this actually works!

You know when you buy a leafy green, such as kale, and then you don't use it immeadiately, and thus it languishes in your refridgerator for a few days? Anyone? Hello?

Well, when that happens, you end up with limp greens. Terrible.


These actually aren't that bad, but are certainly limper than when I bought them. Notice the lack of pep. The slightly depressed curl. These leaves need intervention, STAT!

Happily, somewhere along the way I heard, or read (source confusion, ho!) that if you put some greens into a cold water bath for a while, they will pep right up. Something about the cells that have previously lost water now regaining that water through osmosis or something? I don't know, my Ph.D. is in psychology not biology.

Regardless, it works!

Just take a large bowl and fill it with cold water. Then, put in your limp greens.
I also put a few ice cubes on top to cool things down further and weigh down the greens.


It's amazing! After 10-15 minutes, your greens are all pepped up again! Happy about life! Ready to conquer your recipe! (Except for the disastrous dinner I actually used these greens for... but that's another post).


Wednesday, July 6, 2011

The Best Chocolate Chip Cookies

A couple days ago I had a conversation with a friend... let's call her Dennis. Dennis, bless her heart, is trying to learn how to cook. A few weeks ago she called me to ask how to bake a potato. Yes. You heard me right. Bake a potato.

Anyway, our most recent cooking conversation went something like this:

Dennis: good morning!
Me: good morning! (note: it was around 8:30 PM, but this is part of the Dennis ritual, just part of her charm)
Dennis: you would be so proud of me! I'm baking!
Me: Well done, Dennis! What are you baking?
Dennis: Cookies! Granted, I bought cookie dough and just placed it on the cookie sheet, but it counts for something!
Me: Yes! It's a good step in the right direction!
Dennis: But I need your help.
Me: Oh? (another note: I live about 1,000 miles away from Dennis, so was hoping she wasn't relying on me to call 911 in case of kitchen explosions or anything)
Dennis: How do I know when the cookies are done?
Me: They should be golden brown on top and not burned on the bottom.
Dennis: I just emailed you a picture. Are they finished?
Dennis' Cookies
Me: (fascinated) ... are you baking your cookies in a roasting pan?

Yes. She was indeed baking cookies in a roasting pan. Further, her boyfriend (who doesn't bake at all) also noticed the roasting pan but, unlike me, was too polite to suggest a cookie sheet.

At this point, a few minutes had transpired, so I told Dennis to get her cookies from the oven.

Dennis grumbled something about feeling like the protagonist of a children's novel -- "Dennis bakes a cookie" -- and I suggested that my favorite in the series would be "Dennis eats a sandwich". Never has anyone eaten a sandwich with such wonder and awe as Dennis. It's a thing to behold.

I told Dennis she might want to check on her next batch, and she revealed that she was only making one batch because "9 cookies is enough". What does that mean? Enough for what? The mind boggles.

I should mention here, Dennis is a very smart person. She's a neuroscientist, she does brain surgery for a living, and successfully coordinates and teaches thousands of students a year at a large university. So for all of us who have ever failed at baking the perfect cookie, have no fear, even the best and brightest among us have trouble.

I, like Dennis, have gone through my share of cookie-related struggles... mostly they involve trying to find the perfect chocolate chip cookie recipe. This endeavor involved baking dozens of recipes when I should have been doing other things, like writing my dissertation for example.

There are two secret ingredients that make this recipe so great (I should mention that this recipe was adapted slightly from Jacques Torres' recipe). The first is sea salt, because salty and sweet is a winning combination. The second is time -- letting the dough rest for 24 - 72 hours (ideally 36) before baking really results in the perfect combination of chewy and crunchy. The wait can be hard, but in the meantime, let them eat dough!

Chocolate Chip Cookies
Ingredients: 
2 c minus 2 T cake flour
1 2/3 c bread flour
1 1/4 t baking soda
1 1/2 t baking powder
1 1/2 t sea salt (plus more for sprinkling over the cookies) 
2 1/2 sticks butter
1 1/4c brown sugar
1c + 2 T sugar
2 large eggs
2 t vanilla
3 1/2 c chocolate chips 


Sift the flours, baking soda, and baking powder into a bowl. Ad the salt and give it a shake or a stir to incorporate the salt with the other dry ingredients a little. Don't sift the salt though, it won't fit through the sifter. 

In the meantime, cream the butter and both sugars together until the mixture is very light. This takes about 3 minutes or so in my standing kitchenaid mixer, but it may take longer (more like 5 minutes) if you have a hand mixer or a less powerful mixer.

Add the eggs, one at a time, mixing well after each egg. Add in the vanilla and mix a little more. 

Turn the speed down to low and add the dry ingredients, mixing just until they are combined. You don't want to mix it too much here, because otherwise you'll pump extra air into your batter and we're making cookies here, not souffle! 

Add in the chocolate chips and mix just a smidgen longer, until they're well incorporated throughout the dough. 

Ok. Now this is the hard part. Cover the dough with plastic wrap, put it in the fridge and walk away. 

Yes. Seriously. Walk away. Don't make your cookies now. Don't do it! You'll regret it, they won't be as delicious! 

As a consolation though, you should eat the dough off the mixer paddle. Delicious. But don't blame me if you get salmonella. 

You have to wait a long time -- 36 hours is best, but wait at least 24. You can see how well my self control holds out... I um... maybe eat some cookie dough along the way... 

Once the tortuous day and a half has passed take the dough out of the fridge and let it stand 10 minutes or so while you preheat your oven (to 350). This will make it a little easier to work with. 

Line your cookie sheet (or I suppose roasting pan, if you are so inclined) with parchment paper and use a cookie dough scoop (or an ice cream scoop works just as well) to plop mounds of dough onto the parchment paper. 

Now for secret ingredient #2 -- sea salt! Sprinkle just a little sea salt over the cookies. So delicious. 

Bake the cookies until they are golden brown but still soft, about 15 - 20 minutes. About half way through turn the cookie sheets around and switch racks so the front cookies are in the back and the top cookies are on the bottom.

Transfer your cookies to a cooling rack (or, if you, like Dennis, don't own one, a plate will work) until they're cool. 

This makes a lot of cookies, but I don't know exactly how many because I always eat a LOT of the dough in that limbo, wait for the dough to be maximally delicious, period. 

Enjoy!

Monday, July 4, 2011

The Most Patriotic Ice Cream!

Happy 4th of July! America! Fireworks!


... ok, maybe not EVERYONE's excited about the fireworks... poor scared Cleo.

Most importantly though... cookouts!! This year I'm going to a cookout hosted by my next-door neighbor, and he's making something amazing. A red velvet cake, shaped to look like a steak cooking on a bed of cupcake coals! Amazing. So insanely cool that any dessert I could provide would be superfluous. In discussing his cake with him, we decided that it might be fun to have some ice cream to go along with this fantastic creation... but clearly, no ordinary ice cream would do.

It had to be red, white, and blue.


This gave me the opportunity to try the Cook's Illustrated vanilla ice cream recipe, which I've been meaning to try for a while. It's one of those ice cream recipes where you start with cream and eggs and sugar, turn it into a custard, then turn that into ice cream. Historically I have just done ice cream from cream and sugar, so this I found very exciting.

And you know what? It is very exciting. It's delicious! I can definitely taste a difference! SO, happy 4th of July to you all, and if you want to make some ice cream, let me recommend this... only slightly adapted from the Cooks Illustrated recipe.

Vanilla Ice Cream
Ingredients: 
1 3/4 c heavy cream 
1 1/4 c milk
1/2 c + 2 T sugar 
1/3 c light corn syrup
1/4 t salt
6 large egg yolks (save the whites! you never know when you might need them! and they freeze well) 
2 t vanilla

Place an 8 inch square baking pan in the freezer (or if you're going to red-white-and-blue your ice cream, use 3 jars or bowls)

Combine cream, milk, 1/4 c + 2 T sugar, corn syrup, and salt in a medium pan. Bring up to 175 degrees over medium-high heat, stirring occasionally. It took me about 5 minutes and the mixture should be steaming steadily. 

In the meantime, whisk yolks and remaining 1/4 c sugar until smooth. 


Then slowly whisk in about 1c of the cream mixture into the egg yolks to loosen them, and so they don't cook too much when you add them to the rest of the cream. 
Return this mixture to the pan and cook over medium-low heat, stirring constantly, until the mixture thickens and reaches about 180 degrees. This took me about 5 or 6 minutes. 


Remove from heat and pour into a new bowl to cool until it's not steaming anymore, about 10 - 15 minutes (I put mine in front of the A/C to expedite the process!) 


Take one cup of custard and put it in a small bowl. Cover it an the bowl of the remaining custard with plastic wrap and put the small bowl in the freezer and the big bowl in the fridge. 


Leave them there at least 4 hours -- I left mine in overnight. 


Scrape the frozen custard into the cool custard. This can be tricky if you, like me, left your custard in for more than 4 hours. To loosen the frozen custard, make a warm water bath and stick your bowl in it for just a minute. It'll pop right out! 


Stir until the frozen custard has dissolved into the cool custard. I used a potato masher to help speed things up. 


Then add the 2 t vanilla to your custard and stir well. 


Get your ice cream maker cranking! You want your ice cream to be about 21 degrees and to look like soft serve ice cream, about 15 - 20 minutes.


Yum. Ice cream.
Transfer to your frozen jars or pan and cover with plastic wrap (or the lid of the jar). If you want to dye your ice cream, now's the time! Place some dye in the jar and stir! Then shake the jar up a little bit to distribute the dye evenly. 


Leave it in the freezer for about an hour to give it time to set up a little bit. 

Now coax the ice cream into a pastry bag and pipe it into little ramekins (who are we kidding? jars!) one color at a time. Red! White! Blue! 


If you're not doing the jar method, just transfer the ice cream to an air tight container and try to get as many air bubbles out as you can. 

Freeze until it firms up, at least 2 hours or up to about a week. 


Enjoy!

Friday, July 1, 2011

Mom Never Told Me Not to Do This: Don’t start the recipe until all the ingredients are out.

These are posts about the simple things in the kitchen that you can do to get off on the right foot. Simple things that I somehow missed growing up and therefore had to learn the hard way.

When I get a recipe that calls for several different ingredients, spices, and two pans, I now do the logical thing: I get out all the ingredients, the pans, do a load of dishes so I have a clear sink and clear countertop to work, make sure I have enough spices, and a cutting board and a knife. This is new for me. What I used to do was get the ingredients and tools out, as I needed them, while working.

This caused many problems.

The first was that I would often still be cutting and washing things while the first step of the recipe was burning in the pan. The second was that I would often get ¾ of the way through a recipe only to realize I did not actually own any cumin. I would then make the rest of dish, but the ingredient I left out was invariably a key ingredient and I would end up with something that was not at all tasty. Or too mushy. Or didn’t blend well. As I become a better cook, I get better at improvising. And better at understanding which ingredients are actually key to a recipe and which just add a finishing touch. So, the lack of an ingredient means I don’t necessary have to stop cooking. But, at least now I know about it before the heat is on.


Having enough space to work is also a relatively new revelation. It is rare that a recipe only takes a cutting board’s worth of space, particularly if you’ve got it out ahead of time. A clean sink also makes a world’s difference. Having the ability to rinse something (particularly if you have a clumsy streak and drop it on the floor, ahem), or the ability to put one ingredient aside while you focus on another one is invaluable.

There’s also something quite pleasurable at looking at everything all chopped up and ready to go, all in a nice row, prepped and waiting.


A sense of order and preparedness in this otherwise chaotic and quickly changing world. I guess what I’m saying is that food can change your life! It’s the answer to all your problems! Hallelujah and praise the Kale!